Documentation of EXACTLY how to create a powerful retro video gaming system using a Raspberry Pi 4 with thousands of games from dozens of platforms and wireless controllers.
INTRODUCTION
The science of retro gaming has evolved fantastically with open source projects creating simulations of every major video game console or arcade machine produced up to the turn of the century. Technically these can run on most modern operating systems but Raspberry Pi (a powerful tiny commodity computer) has become popular due to standardized hardware. In recent years gamers have built beautiful integrated gaming environments for Raspberry Pi with searches, favorites, and animated previews. Behind the scenes a fancy menu system ("Emulation Station") wraps a launcher ("RetroPie") in which emulators are managed as plugins, each with rom collections, on a simplified Linux OS.There's two main options, ready-made or DIY. One popular ready-made is a "Retro Game Fan" on Facebook who converts official SNES Mini's into 1TB multi-games, cute but ends up being ~$300. CrispConcept.com sells a variety of pre-builts for $140-200. Amazon also sells some despite questionable rights. Ultimately I went DIY mainly for wireless gamepads but also to control which image to install, but that route requires moderate nerd skills.
Going DIY I didn't easily find a detailed written guide for this exact case, so I've documented my experience for others. Ultimately it turned out to be pretty predictable, but does require some torrent downloads, the biggest of which took days.
PARTS
I've made an Amazon list of the required parts. Full options is ~$200 while a minimum system is <$120.Amazon.com/hz/wishlist/ls/2GIIGXN7SIJA1
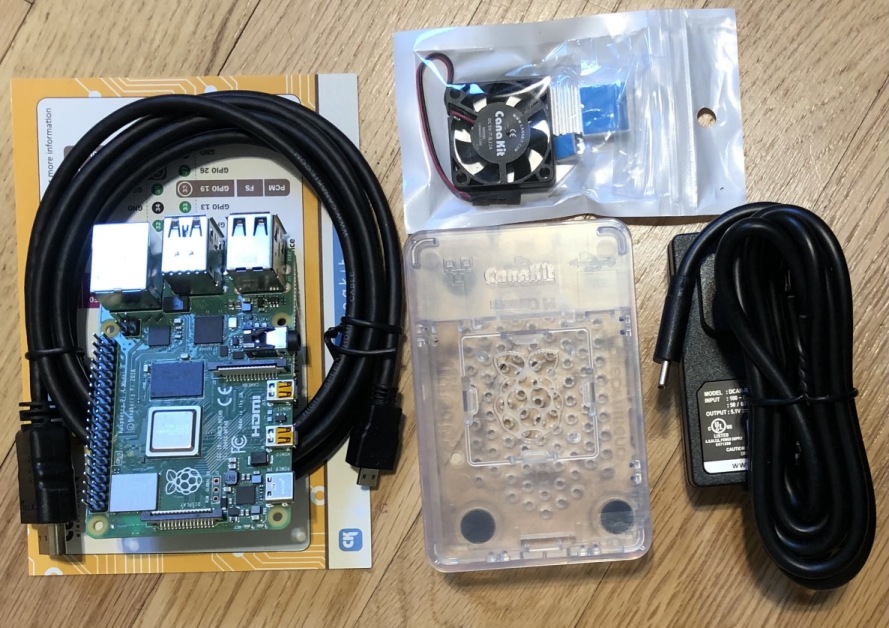
- Raspberry Pi 4 4GB, CanaKit basic ($83):
Amazon.com/dp/B07VYC6S56
Includes clear case for nerd points, fan for performance, and official USBC power supply, but no boot card. Technically this is a 1.5GHz 64-bit 4xCore CPU w/ 4GB RAM, 2xHDMI, 2xUSB2, 2xUSB3, uSD slot and lots of "maker" features. - Keyboard, mini wireless with touchpad and backlight ($24):
Amazon.com/dp/B06XQ6RRSK
Required for some advanced setup or running a media system. Could do without if you have a spare USB keyboard, but this one's tiny and wireless and backlit. uUSB charged. - Gamepad, Bluetooth, 8Bitdo N30 Pro2 ($40 each):
Amazon.com/dp/B07HDVZP84
Not cheap but top quality. Bluetooth, light and thin, dual analog sticks, dual triggers, rumble, retro styling. USB-C charged.
CHEAPER LESSER OPTION: Wireless SNES style gamepad controllers ($24): Amazon.com/dp/B07XM5FR1L
Connects instantly with no setup, uUSB charged, inexpensive quick start to two player games. But no analog sticks so many including all N64 and Dreamcast don't work. - Flash cards, micro SD, class 10 "uSD" (choose any or all depending on needs):
Which of these to buy depends on what you want to be able to do. If you're building the biggest though you may as well also have the smaller ones if you don't already own such cards spare.- 8GB fits basic bootable "Raspberry Pi OS" (~$7):
Amazon.com/dp/B00BDS426G - 32GB fits popular "Christmas" collection of 2,062 arcade games (~$11):
Amazon.com/dp/B00M55C0NS - 256GB fits huge "Wolfanoz" collection of 12,990 games (~$45):
Amazon.com/dp/B072HRDM55
- 8GB fits basic bootable "Raspberry Pi OS" (~$7):
SOFTWARE
I created three different bootable uSD cards to gradually increase complexity as I gained experience.- 8GB - First time users should try booting a small image containing just an operating system at least to confirm everything works.
Raspberry has an official tool to create a few versions of this.- Download the Raspberry Pi image writer free from Raspberrypi.org/blog/raspberry-pi-imager-imaging-utility
- Install the downloaded Image Writer on your PC.
- Insert an 8GB card in your PC using an adaptor as needed.
- Run the Raspberry Pi Image Writer program.
- Click CHOOSE OS and pick the recommended "Raspberry Pi OS (32bit)"
- Pick the 8GB device and confirm.
- Write. This creates a bootable uSD card and validates. Card can be removed without ejecting upon completion.
Creating the retro gaming system images requires BitTorrent to download. To the best of my knowledge these are safe to download without a VPN. Your ISP may feel differently, and may also not permit or charge extra for the sheer size. These big files are packaged as torrents containing many "part" files. The parts are a WinRar (.rar) archive which extract to an image (.img) file. If any Torrent links don't work try googling the title. These images were found at ArcadePunks.com/download-raspberry-pi-4-images
Required PC software:
- If you do not already have a BitTorrent client download qBittorent free from qBittorrent.org/download.php and install.
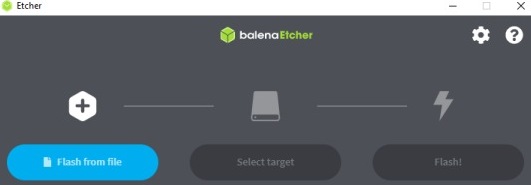
- You will also need an image writer, download balenaEtcher free from Balena.io/etcher and install.
- And finally an archive extractor, download WinRar free from win-rar.com and install.
- 32GB - Christmas collection for Pi4 containing 2,062 arcade games is a good starting point for retro gaming given the manageable size.
Torrent Link • Title:[32gb]-Christmas.Pi.RPI4-Scoony.Hursty • Image:ChristmasPi.img
- After download, click lowest named file to open WinRar.
- Drag image file from WinRar to extract it. Close WinRar.
- Delete the job in qBitTorrent and delete the downloads.
- Insert a 32GB card in your PC using an adaptor as needed.
- Run balenaEtcher. Pick "Flash from file" and select the Christmas image.
- Pick the 32GB device and confirm. You do not need to format it.
- Click Flash. This creates a bootable Christmas RetroPie uSD card and validates. Card can be removed without ejecting upon completion.
- 256GB - Wolfanoz collection for Pi4 containing 12,990 games across 60 platforms.
Torrent: Torrent Link • Title:[256gb]-Wolfanoz.Supreme.Pro.RPi4-Wolfanoz • Image:Wolfanoz_Supreme_Pro_RPi4_256GB.img
Follow the same extraction instructions as for above 32GB card.
NOTES The time required for this download and flash can be extreme, and the file sizes taxing on operating system and utilities. On my WiFi the download took literally two full days, extraction was four hours, and flash was two during which the PC should be left undisturbed and ANOTHER FOUR to validate the write. ALSO extraction creates a temp file so altogether you need ~750GB of space and PAY ATTENTION to your Torrent AND Rar download and temporary path settings. I recommend rebooting between each major step above to free memory and commit writes. I also recommend using a good SD adaptor and UNALLOCATING all partitions (use diskmanager as admin in Windows) before flashing.
ASSEMBLY
- Charge keyboard and controllers in advance.
- Read the Pi's included instructions.
- Separate the case into its three parts.
- Snap main card into bottom plate first, gently while touching only edges.
- Attach all three heat sinks. Use extreme attention as they cannot be repositioned. Consider tweezers.
- Do not put in uSD yet. Snap base onto middle, leading from USB side.
- Snap fan into top, label side inward toward card, wire leaving at open corner.
- Connect fan red to pin 4 and black to pin 6 of "GPIO" block. Looking at board with GPIO at top, pin 1 is lower left and 2 is above it, so 4+6 are top row 2nd+3rd from left.
- Snap the top on to complete the assembly.
- Insert the 8GB BOOT uSD created earlier, contacts side facing the board. On mine the uSD did not click in as I'm used to, but was certainly firm.
- Place the Pi somewhere safe and stationery near power and monitor.
- Connect the power switch extension to the USBC jack.
- Plug the gamepad and keyboard wireless receivers into any Pi USB jacks so they are available at first powerup.
- Gently connect the micro HDMI cable end to the HDMI0 jack immediately adjacent to the power USBC.
- Connect the HDMI to a monitor. Turn on the monitor and select the proper HDMI.
- Connect USBC power to the Pi's switch extension. Connect the Pi's transformer to an outlet.
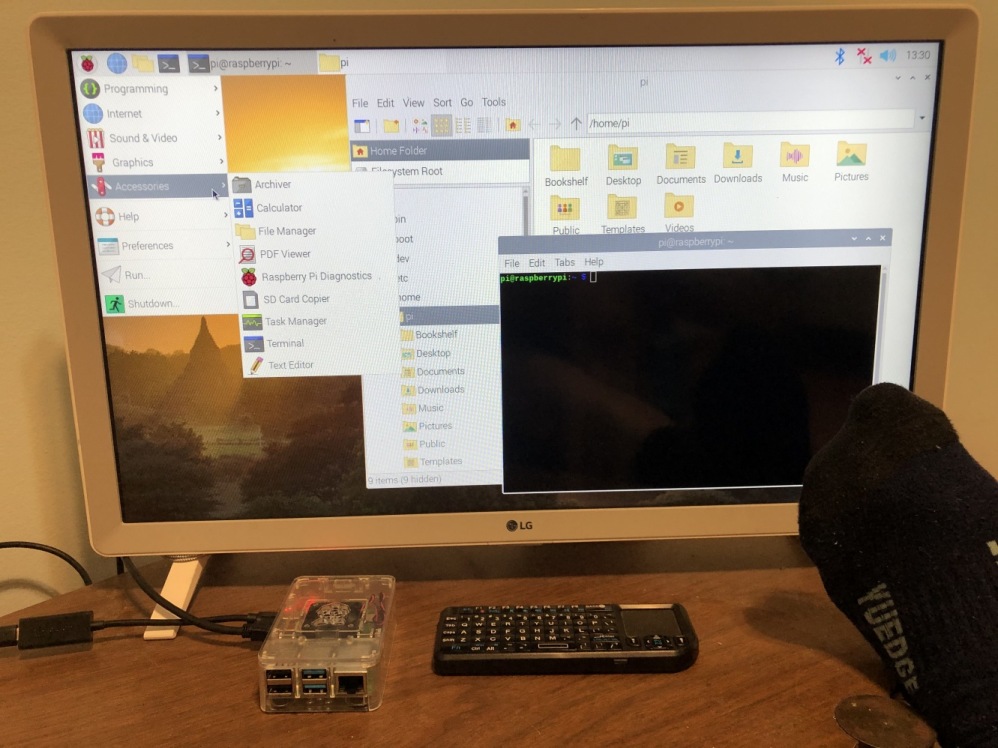
This should boot to a "Raspberry Pi OS" desktop, useful mainly as a proof of life.
Formerly called "Raspbian" it was forked from Debian Linux. Nerds may install additional apps and use it as a basic PC from this point. Works with keyboard and touchpad.
Shutdown when done, then swap in one of the RetroPie uSD created in the preceding SOFTWARE section to proceed.
CONTROLLER SETUP
First boot of a RetroPie system: After a splash screen and loading Emulation Station, RetroPie will want to configure your game controllers, so it's important to get it just right the first time.- I recommend booting the first time with only keyboard attached:
- When prompted, hold down a key to go through keyboard setup.
- Go through the button programming as directed.
- Define the cursor keys as the DPad, use SHIFT and ENTER for Select and Start, use actual A/B/X/Y keys for those pads.
- Hold down any key for two seconds to skip any buttons.
- The final "ENABLE HOTKEY" option is critical, press SHIFT to define Select as the special in-game modifier key.
- Save on final OK by typing A. Be patient after OK for controller set up to save.
- Type Enter (START) to pop up RetroPie's main menu, then select Quit, and select Shutdown System to make sure your settings are saved.
- If you have any Bluetooth Controllers power up the Pi again to configure those:
- For 8Bitdo controllers, check for firmware updates using their tool.
- With the keyboard still attached, once RetroPie is rebooted, with the bluetooth controller nearby but not turned on, ...
- Use cursor keys to move down to OPTIONS, one of the last selections on the game machine list. Type A to select.
- On OPTIONS menu select RETROPIE SETUP. This exits to text mode programs which are unfortunately very small type.
- On the Retropie Setup Main Menu select Configuration Tools.
- On the Configuration Tools menu select Bluetooth.
- NOW Power on your controller. For 8Bitdo models, power on by holding B+START to forces it into Android mode, confirmed if blue lights repeat a single blink. This seems to be required for compatibility w/ Dreamcast&N64.
- Hold in it's PAIRING button until it starts quickly blinking. The next few steps must be finished fairly quickly.
- On the Bluetooth menu select Register and Connect to Bluetooth device. Wait for the Pi to search, your new gamepad should appear on the list. Quickly select it using cursor keys and type Enter, then wait.
- If it does not appear on the list, escape back and try again as the device list is sometimes flakey. You may need to try the above steps several times. If your controller persistantly doesn't appear, use the menus to remove EVERY bluetooth device, reboot and try again.
- When prompted for a security mode pick the first one: DisplayYesNo.
- Soon the Pi should give a connected message.
- For 8BitDO models, return to the configure Bluetooth Devices menu and run the "Setup udev rule" script.
- Back at the configure Bluetooth devices menu, select Configure Connect Mode and set it to Background (or default) if it's not there already. This has the Pi connect to the controller on boot as well as invisibly reconnect any time.
- Use right cursor key to select Cancel, Back, Quit, to regress through menus and exit Retropie Setup program.
- Back in Retropie click Start to pop up the main menu, then select Quit and Restart System.
- The Pi should now reboot with the newly added Bluetooth controller automatically connected.
- If the system does not automatically prompt after reboot to configure the newly connected gamepad, click Start on the keyboard for the pop-up Main Menu and select Configure Input to make sure the controls are properly mapped.
- When configuring buttons, hold down any key for two seconds to skip any missing ones. The final "ENABLE HOTKEY" option is critical, press SELECT to define it as the special in-game modifier key.
- On future boots use the quicker BlueTooth Reconnect instructions at bottom.
- Finally configure any USB Controllers:
- Shutdown the Pi. Connect any wired controllers or plug in the USB dongles for any 2.4GHz wireless gamepads.
- Turn on the Pi. If the system does not automatically prompt after reboot to configure the newly connected controller(s), use the keyboard or bluetooth controller to press Start for the pop-up RetroPie Main Menu, then select Configure Input.
- When configuring buttons, hold down any key for two seconds to skip any missing ones. The final "ENABLE HOTKEY" option is critical, press SELECT to define the special in-game modifier key.
- Save on final OK by pressing A. Be patient after OK for controller set up to save.
TWEAKS
Once the system is running, several major improvements can be made through the menus.- OVERCLOCK: The CPU speed can be increased *IF* you have installed heat sinks and a fan.
Options > RetroPie Tools > Overclocking > 1750GHz(/620 GPU). Reboots after keypresses. Required for reasonable Dreamcast&N64 play. DO NOT overclock to 2GHz. Reduce speed if lockups occur. - WIFI: Allows remote access, updates, scraper, etc.
Options > RetroPie Tools > WiFi > Connect. May require repeated attempts for accurate scan of networks. - RESOLUTION: Reduce the resolution of TEXT menus for better readability.
Options > Raspi-Config > Display Options > Resolution > CEA Mode 4. - SAMBA: Allows access to folders on the Raspberry Pi remotely over shared local WiFi network.
Options > RetroPie Setup > Configuration / Tools > Samba > Install.
From Windows PC: Explorer > Add Network Place > \RETROPIE\roms > Pick mount name. Optionally mount other folders. - SPLASHSCREEN: Disabling the splash video makes the boot a few seconds faster.
Options > Splashscreen > Enabled On Boot > Disable. - UPDATE: Bring OS and packages current. Not strictly necessary and some risk but may improve security and performance.
F4 (to quit from ES to OS) > sudo RetroPie-Setup/retropie_setup.sh > several confirmations > looooong update, accept default answers at prompts. Eventually reboots.
BlueTooth Quick ReConnect Instructions
- Controller OFF (hold start 7+ seconds if needed to force), placed near Pi.
- Boot Pi with a keyboard attached.
- OPTIONS menu RETROPIE SETUP > Configuration Tools > Bluetooth.
- Controller ON (press start). (Hold PAIR if not already fast blinking)
- On Pi select Register and Connect to Bluetooth device. Proceed quickly:
- Wait for the Pi to search, controller should appear.
- Quickly select it using cursor keys and press enter then wait.
- When prompted for a security mode pick the first one: DisplayYesNo.
- Soon the Pi should give a connected message.
- Configure Bluetooth devices menu > Configure Connect Mode > Background
- Cancel, Back, Exit, back to Pi. Select POWER > Restart
- If controller doesn't respond, use Configure Input from RetroPie main popup menu.
FUN
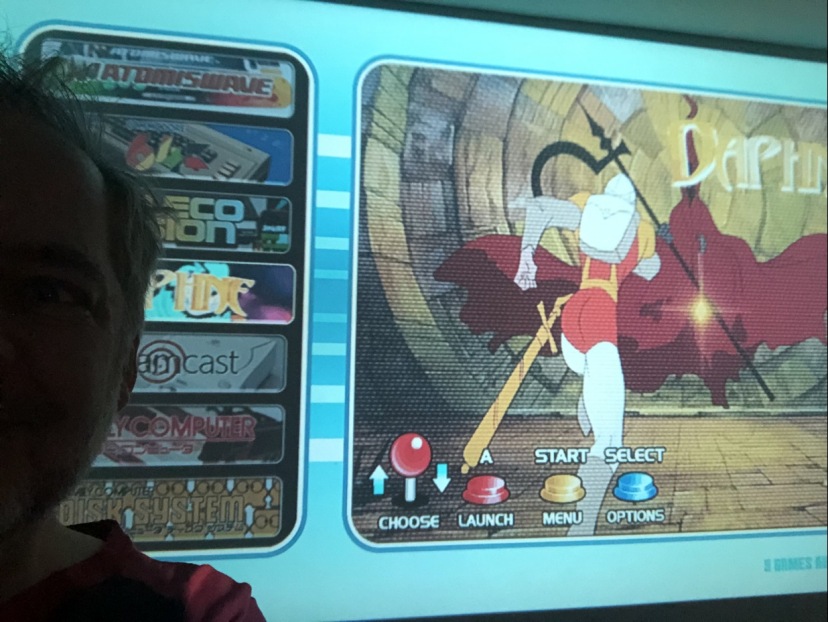
Basic RetroPie hints: Menu navigation: A=OK, B=Back, Select=Options, Start=Config.While running a game hold SELECT("HotKey")+START to exit or SELECT+X for options.
Has a several minute Peanuts video at startup I haven't found a way to skip. After that it's adorable if you like Christmas, even includes classic background music. Contains 2,062 arcade games including personal faves like Sinistar, Marble Madness, Zaxxon, Terminator, etc, so I'm happy as a teen. It even has Vector classics like Star Wars and Tempest. Just a few which originally had flight controls or steering wheels ran but gamepad didn't work.
Mind-boggling. 12,990 games across 60 platforms, consoles, arcade games, and even oddities like handhelds and vintage computers, with video preview thumbnails. Perfect retro background music and rad transition screens. A masterpiece. See examples online at YouTube.com/results?search_query=wolfanoz+256gb
Probing hard for weaknesses, just a few odd games crashed hard, some would work though on a second try. SNES Socks the Cat is absent which may indicate homebrew / unreleased games lacking, but there may be a process to add ROMs. At the high-end there's some N64, but no Cruisin nor PS2 due to hardware limitations. Looking ahead, this configuration may be an ideal balance. As an upgrade in a year I could see perhaps getting a 400GB collection, but each big memory increment adds significant cost, and it's already hitting CPU performance limits. Further, I've seen collections in the TB's, but cost aside, I don't have time nor space to download such a thing, so I'm gonna call this perfect.


ADDING ROMS
- On a PC, format a flash drive as FAT32 or NTFS.
- Create a /retropie folder on that flash drive.
- Safely eject the flash drive from the PC. Plug the drive into the Pi and turn the Pi on.
- Allow the Pi to fully boot and watch for the flash drive's light to go idle.
- Turn off the Pi and remove the flash drive.
- Plug the flash back into the C and it will now contain /retropie/roms/[systems] subfolders.
- Copy your ROM into the folder for the target system.
- Safely eject the flash drive from the PC. Plug the USB into the Pi and turn the Pi on.
- Allow the Pi to fully boot and watch for the flash drive's light to go idle.
- The new game should now appear on the list under the target system.
- Use the Scraper to add missing previews (works best for known games with exact names).
- Turn off the Pi and remove the flash drive.
- Plug the flash back into the PC and it will now also contain captures of config info from the Pi as well.
1TB IMAGE
After a few years use of this system I upgraded to a ONE TERRABYTE image on an external SSD drive, costing <$100. This lists 24721 games, with the size enabling complete CD image collections for the more modern platforms. This image required literally WEEKS to download. Just extracting the archive, and writing the image to SSD, required a full day each. Enabling SSD boot required a separate single use utility uSD image. I keep a backup of the 1TB image despite the size burden, and have needed to reimage it once (ALWAYS shutdown before unplugging drive). In the process I've recorded my favorite games list, as I've had to recreate it a few times. The experience has been satisfactory and I'm proud of having gone the extra mile.COMPLETE LIST of 23,719 games available on the 1T Wolfanoz RPi4 collection.
See related article on building a RetroPie gaming system with a tiny Raspberry Pi Zero 2 W
NEW! Searchable / filterable index of all games on a FOUR TERABYTE retro gaming system.
The world's FIRST video game from 1962 in touch / mobile / browser form, runs the original paper tape code!
↑ MORE
2021.02.07